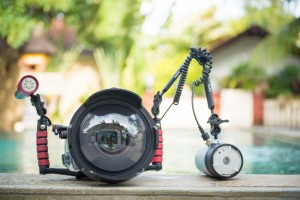
You might be looking at investing in an underwater camera system, or you might already own one. If you’re curious why you might choose a dome port vs. flat port, or where to put your strobe(s) for the best photo, this post might be for you. We’ll go over the different types of ports and what they mean for wide and macro photography, as well as where to aim your lights to get various photo effects.
PORTS
A dome port is almost always going to be your best bet. They provide the best option for wide angle lenses and can be used for macro if you’re only looking to own one port. Typically larger is better (weight and size permitting), giving less chromatic aberration and reducing the appearance of any scratches/imperfections in the dome.
Flat ports, due to the refraction of water, provide some apparent magnification and fare better with long focal lengths such as those used for macro photography. The magnification means also, however, that you can’t get as close to your subject, so if the water is murky you might have issues with cloudiness in your images. Domes preserve the wideness of the lens, meaning you can get nice and close to your subject. Just don’t get too close and bump into it with your port!
STROBES
Lights can get expensive quickly, so you can get by perfectly fine with one (especially if you use a diffuser and are able to get creative). If you can get two, even better! You can use side light or use one as a key light and the other for fill.
When combined with the complications of scuba, underwater photography can be a whole new learning experience, but a lot of the same conventions still apply to making beautiful photographs. Take your time, think about your image, composition, light, and intent. It’s easy to forget these things when you’re already monitoring buoyancy, current, air consumption, and a buddy.
You can position your lights very close to your lens to give a flat but colorful image. Great for macro and brightly coloured subjects! Spread them out on either side of the camera for larger subjects or a more detailed, shadowed appearance to your subject. Subjects with prominent dimension and texture will benefit greatly from this technique.
If you shoot up, you can use the sun’s rays (and often the beautiful blue surface) as a clean backdrop for your photo, while lighting the front of the subject with your strobe. If you wish instead to mimic the sun’s light, swing your strobe up above the camera and aim it down at the subject for a top-light/side-light combo.
In all of these positions, be sure to reduce backscatter by aiming your strobe almost parallel to the lens so that the edge of the light from your strobe falls on the subject but there is no excess light falling on the particulate between you and the subject. Centering your light(s) on your subject will produce backscatter, clouding and quite effectively distracting from the image.
—
Just like dry photography, your interpretation and execution of what you experience underwater is what makes the image. There are endless amounts of tutorials and instructions on how to achieve X or Y effect, but hopefully with the information here you can head out diving and capture what you see in your own, unique way. If you’d like to further develop your knowledge, check out the PADI UW Photographer specialty! We’d love to see what you’ve captured, but if you’re feeling like you’re lacking some time underwater, we can help.